Showing posts with label shawls. Show all posts

Tuesday, 16 December 2014

Emilys Shawl and a little chat

I feel like a spinning top, someone pulls my string and I'm off spinning spinning all day long, I bet you all feel the same phew I'm dizzy with all the hustle and bustle and planning and list making and crocheting and knitting of last minute gifts.

 I just love seeing what you have all been making, so much inspiration! and thank you for all the lovely link up's at this months stash party do take a peek and do some visiting, there are some lovely makes there.

I managed to get Emily's shawl finished......


The pictures are not great as I took them at work on my phone, you have to grasp every minute you have at this time of the year...


so I took the almost complete shawl to work, all I had to do was trim the tassels and take the photo's and I managed to get that done in my lunch break.....


This was super easy and very quick to make, I think it only took me three days and I love it, of course I did model it for the ladies who were attending the Day Unit on that day, they all whistled at my catwalk interpretation and loved the shawl no pictures of my modeling debut I'm afraid :)


The sun came out and I quickly draped it over a chair to capture the suns rays.


This shawl was made with Lucys cosy blanket pattern, it was made with yarn that I had in my stash and I used the random stripe generator it's great fun give it a try if you haven't already 


The edging 1sc, 2ch, 1sc in every other stitch  I'm not sure how Lucy edged her blanket I honestly haven't had the time to check it out but this is very quick and easy. So there you have it I can cross this one off my list.

All the decorating, crocheting and knitting have caught up with me I'm afraid, I'm left with a very painful left shoulder and my thumbs are really hurting but I'm nearly done..


I've been making a cowl and there's just the buttons to sew on, I will show you when it's finished.  I have started a knitted cowl which I pulled out twice because I wasn't happy with it, still not sure! 
 Tree is up.....


I'm going to put the marzipan on the Christmas cake today, 

My lovely son is home from Cambridge and I'm going to spoil him rotten! and his girlfriend Emily will be here in six days yay!

I want to make yet another cowl I'm using this wool


and I would love to make some Christmas tree decorations if my painful hands will let me!

Gosh this post is long I have been on my laptop for 2 hours and I still haven't managed to catch up with you all but I will before the day is done, I hope you are clicking on the advent calendars at the top of my blog, there are some great free patterns and it's fun!  (they are not affiliated links by the way)

Have a great day everyone
love ya! 

linking with


 photo e69a549e-0e33-465a-b88b-a6ebe916eaaa_zps34480328.jpg

Monday, 8 December 2014

New Shawl beginnings and a room transformation.

Last week was a very busy one for me, I took a week off work to catch up on some jobs that really needed doing but more about that later first.....at long last I have started making Emilys shawl, Emily is an elderly lady who used to attend Day Unit she asked me to make it for her months ago.


I'm using Lucys cosy blanket pattern and it's coming highly recommended it's a great pattern to work when you just need to pick something up and get on with it without much effort, it was just the thing to work on between jobs, it won't take me long to get this finished and hopefully Emily will have it in time for Christmas.

Life has been pretty much in a muddle this past week and so has my house, every room was packed with bits and pieces I have taken out of the small room so that I can get it ready for another Emily, this time my sons girlfriend.  She is arriving from Hong Kong on the 22nd I know I have mentioned it several times before can you tell I'm excited to meet her, I'm hoping she will let me put a photo of her on here so that you can meet her too.

Please don't faint when I show you these next pictures but be warned they are pretty bad and I do feel ashamed of myself but I must show you the before or you won't appreciate the after, I'm saying nothing I will just let you gasp in horror this is the small bedroom which also doubles as a study and a dumping ground.....


As you can see I wasn't exaggerating


It took a lot of clearing out and wall preparation especially under the window, a few months ago workmen repaired the outside windowsill and all the plaster fell of the wall on the inside, he did plaster it up again but it was a makeshift job and the wall was and still is quite bumpy in places but I did my best and covered it with lining paper.


and yes I'm a messy worker too! I painted the walls with pink harmony a lovely shade of pink, painted the door and the skirting boards then pulled up the old carpet..


and laid a new one then...


hung up the new curtains, aren't they pretty :)

So here it is all finished.....


Emily is a great cat lover so I have placed this little friend on the bed to greet her when she comes :)

So what do you think, do you like it? I love it it's so cosy and warm, I hope Emily will like it too.

Apart from readying the bedroom last week, I also tried to repair the wall under the bay window in the sitting room it had crumbling plaster too! it looks better but certainly not perfect and of course I had to find a home for all the junk I took out of the small bedroom, a lot of it ended up at the skip it feels great to have a huge clear out don't you think?

Now I'm sure I heard something about Christmas coming soon perhaps I had better start thinking about that now. 

Have a great week all of you and enjoy your Christmas preparations. :) xx 


Linking with Messy to Classy Link Party


 photo e69a549e-0e33-465a-b88b-a6ebe916eaaa_zps34480328.jpg

Wednesday, 16 April 2014

One to Love

The Nola Granny Shawl


I made this shawl a while back but haven't had time to show you until now. I really enjoyed making this and lets face it who wouldn't love making a granny shawl, so easy and cosy to do, no thinking required just let your hands yield the hook while your mind drifts to far off places, warm beaches and sunshine far away from the cold winds and rain of the North East of England ;)


Made totally with stash yarn, I used a strand of double knitting together with a strand of 4 ply in green and Aran weight in navy keeping my fingers crossed that the navy wouldn't run out.... there was just enough!


I found the shawl here and wanted to make it right away, I loved the edging which Pammy Sue used for her shawl but I knew I wouldn't have enough yarn to make it so I used the edging from here ( you can find links to other shawls and poncho's there too.)


The Nola shawl is named thus, because the sound of the name Nola makes you feel warm and cosy and the name actually means fair shoulder, sounds very apt don't you think?  If you think I'm a little crazy (or a lot) that's ok too ;)

This shawl will be joining the gentle ripple and the Luana, eventually to be sent to SIBOL


This shawl used 362 grams of yarn
linking with..


Thank you to those who have joined in the fun and have tried to guess the joining colour of my blanket which is now finished yay!!! I'm just waiting for some good lighting so that I can take some decent photo's.


There is still plenty of time to guess, the last guess to be in by midnight 27th April. 

With lots of love.


Wednesday, 19 February 2014

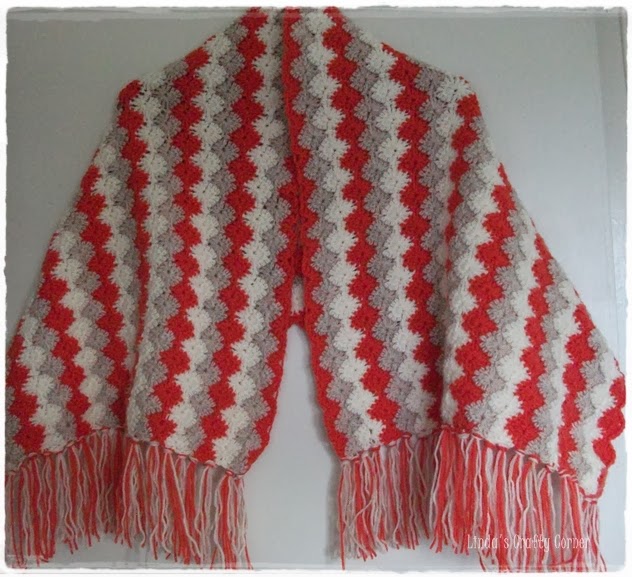
The Luana Shawl

Remember the Gentle Ripple. well I can honestly say I loved making that, it was fun to make and it grew very quickly.  I couldn't wait to make another shawl...

Not a ripple this time but with a stitch I have loved and admired for a while now, the Harlequin stitch or Catherine's wheel, or large wheel, whatever you would like to call it.


Luckily I had just the right blend of colours in my stash, cream, terracotta and biscuit.


I had never tried this stitch before so it was something completely new to me and luckily I found it very easy, perhaps the only place where I needed to think was the end of rows, I had to keep a check on them and I did make a few mistakes before I got the hang of it.


I loved the way it was working up and the colour combination.  However after a couple of days I sat back and took stock and realised that although I seemed to have done a lot of work on this shawl it wasn't growing very much.


It was only then that I realised that you need two rows to form the circle meaning it's only growing every two rows so of course it takes double the time!


As you can see I did get there in the end but it took me far longer than I would have liked.


shawl,crochet,easy

I think it was worth it but I won't be making another one like this any time soon because I'm very impatient and like to see results very quickly. I do love the stitch and I will use it again but for smaller projects.

If you would like to make one......

You can find the stitch how to here
My shawl measures 120cms x 49cms
Yarn used, Dk 311 grams

Are you wondering about the name the Luana Shawl, well at first it was going to be boring Harlequin stitch shawl and I felt it deserved something better than that, so ok how about the Catherine's Wheel Shawl....I goggled it and as I thought there are quite a few of those, so I felt a little psychology was in order, I gazed at my shawl to see what kind of feelings it evoked,  I then went in search of a name that encompassed those feelings and so The Luana Shawl was born.  

The Meaning of the name Luana.....content, happy, I'm hoping those feeling will be conveyed to the person who gradually gets to wear it.

This shawl will eventually be accompanying the gentle ripple and will be sent to SIBOL 
I am enjoying the shawl making process because it's something I haven't done much of before, I'm thinking a triangular one next and I do have a pattern in mind but first there is a little cape that needs my attention :)

See you all on Friday

Linking with


Tuesday, 4 February 2014

The Gentle Ripple How To

Thank you for all the lovely comments you left for the Gentle Ripple Shawl and for all the requests I got for the pattern.

 This is a simple ripple pattern it's called an eyelet ripple and is no way my own, I have seen lots of beautiful projects using the same stitch, but I couldn't find a precise pattern or tutorial that I could link back to so I have written it down here with a tutorial for those who are new to crochet or ripples.

For those of you who are old hands at rippling this first part is for you.
This is written in UK crochet terms.
***
We are using


 trebles = tr  ( US DC )
chains = ch

I used Double Knitting Wool and a 4.5 mm hook
It takes 280 grams of yarn.

I hate counting chains and usually just chain until I have the length I need and double it with a few more for a ripple, then I just keep working the first row until it's the length I need if there are too many chains it's easy to get rid of the excess, better too many than too few.

This shawl measures 44 inches or 112 cms if you want a precise chain count the pattern is a multiple of 9  and add 3 for the foundation row.  So for a shawl this size it would be a chain of 210 
***
Row 1 :  1 tr in 4th ch from hook, *1 tr in each of next 2ch, tr2tog over next 3ch, (leaving centre ch unworked) 1tr in each of next 2ch, (1tr, 1ch, 1tr) in next ch, repeat from*, end with 2 tr in last ch.  (change colour if you wish) 3ch turn.

Row 2 : 1tr in first tr, *1 tr in each of next 2 tr, tr 2 tog over next 3 sts, ( leaving previous rows tr2tog  unworked), 1tr in each of next 2tr, (1tr, 1ch, 1tr) in 1ch space, repeat from *  ending with 2tr in top of 3ch. 3 ch turn

Just repeat these two rows changing colours when you like until it is the length you require mine measured 48 cms, add tassels if you wish.

I remember my first ever ripple, I just didn't get it, it took me ages to understand the how to but once I did I fell in love with the ripple and it's become one of my favourite stitches, so for those of you who are new to rippling or working chevrons or zig zags whatever you like to call them, I hope this tutorial will help.

Read from *** to *** above or if you like make a sample piece first of 30 chains.


Foundation Row
Second Row

Phew I hope all that makes sense, just continue in this way until it's the length you want.

Just a quick note about loose ends, you can carry the yarn up the side of your work if you like and then do a row of dc/sc up the sides to hide them, or you can do as I did and cut them as you go leaving them quite long, I then tied them off in pairs, inserted tassels at the same point and just pulled the ends through with the tassel.


Have fun whatever you decide to do, if you do decide to make one of these I would love to see yours. :)

Any questions?..just fire away.