Showing posts with label tutorials. Show all posts

Friday, 18 February 2022

Having Fun with something new

 Becki from the blog Field Lilies has decided that she is going to push herself to try as many new things as she can this year and has invited us to join her, you can read her post here.

I think that it's a great idea because we all know that it's good for us to try something new, it keeps our brains active and it boosts our mood as well. Most of the new things I try I have to admit are mostly craft related but there are a few exceptions and I want to expand on those.  I have counted up the new things I have tried so far this year and they are as follows

  1.  Made a square with a c2c chart.
  2. Dabbled in needle felting
  3. Assembled a lamp for the first time (I don't know if that counts but it's my list so it's staying there haha)

Number Four

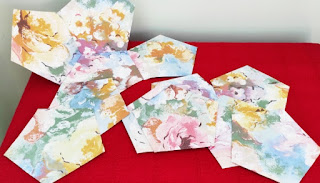
Who would have thought that cutting out countless pentagon shapes would be so satisfying.  

I was unable to attend my u3a Patchwork Group for the last couple of sessions because I was unwell, although it's called a patchwork and embroidery group we dabble in all types of crafts really which always makes it interesting and a lot of fun too.

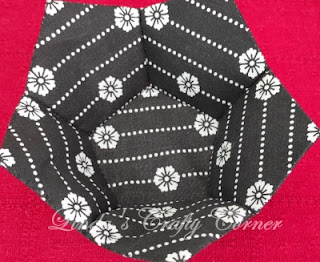
The leader of the group was good enough to email me details of  what they were making  and provided me with instructions and templates for the pentagons.  The object is to make little bowls using fabric pentagons using the English Paper Piecing  (EPP)  method.


When I looked over the instructions and realised the amount of work involved I thought no way! but do you know I'm enjoying every bit of the process.


 I didn't think I would have the patience to cut out all the bits that I would need, as it turned out, I was completely absorbed and it kept me totally focused on what I was doing which in turn helped me forget the awful way I was feeling health wise. 

  I was so happy with how this cute little bowl turned out and as you can see I even managed to centre the fabric so that it all looks quite symmetrical, I'm feeling quite proud of myself  😊.


Now that I'm feeling well again and going about my daily business as usual, I'm feeling quite frustrated that I don't have enough time to just sit and play with these pentagons all day.  Everything I was going to do this month has been put to one side so that I can focus on these but now I need to stop and make room for something else, I can continue with these next week at the next patchwork class.


If you would like to try these yourself you can find a great tutorial here  
and on YouTube here

Number Five 

I've joined my u3a Italian Language group, now this is a biggie for me because I'm finding it increasingly difficult to retain new knowledge it seems to take me so much longer than it used to and Italian is entirely new to me.  I was completely overwhelmed at my first session yesterday but I'm determined to give it a try so please wish me luck I'm going to need it. 😵


Have you tried anything new lately?

Five new things so far for 2022

Take care until next time. 😘😘


Linking with Kathy's Quilts Slow Sunday Stitching.

Sum of their Stories Handmade Monday


Friday, 19 March 2021

Introducing The Snail Trail

Thank you for all the lovely comments I received about the Arizona Blanket in my last post, and it was lovely to hear from Preeti again after a long absence in blogging, I always feel happy when I see a blogging friend returning to blogland.😊

As you may have gathered painting rocks has become quite an obsession with me. Last year I was obsessed with decoupaging on rocks, that was fun too and there will definitely more of that in my future but painting rocks is more challenging and requires a bit more skill, because of that I put off trying it for the longest time. The more I researched it the more intimidated I became, some people's rocks are real works of art. 

I think once I agreed to accept my limitations that's when I started to have fun. It doesn't matter if you are talented or not it's the process of actually painting the rocks that's the most important thing. I decided that I love fun and quirky cartoon type rocks and I could cope quite well with those. There are lots of tutorials on YouTube and on Facebook. When I saw a tutorial for these snails by a lady called Carol on Facebook I was hooked and couldn't stop making them and that's when the idea of the snail trail was born.

Each snail has a name and I have introduced each snail on the back of the rock explaining that they are a part of the snail trail, along with an inspirational quote. I'm hiding these on my walks and am hoping that the snail trail will become popular with the local children wanting to find lots of snail trail members. 

SIDNEY

SIMON

SALVADOR

SONYA

SUZY
SALLY

SHELBY

SARAH

I'm having lots of fun painting these and they are so simple you can get kids involved too. All you need is a rock, pencil, Acrylic paint and or watercolour pencils and a fine liner pen to outline, then a coat of  outdoor varnish.

You can find lots of Carols Tutorials on Facebook this is her page..

Carol's Rock Painting Tutorials

Did you know that painting rocks is good for you? click below to see why..

Benefits of Rock Painting

I will be dropping that little family along the school route when I take my next walk, and will start preparing another batch along with some cute Easter Rocks.

I'm pleased to say that after all the problems of last week, this week there has only been one thing that's gone wrong, a torn windscreen wiper! (there always has to be something) luckily it was on the passenger side so I was able to complete my journey.

 My son in law asked me to measure it and said he would come and replace it for me. He duly came to do just that but found that the new wiper didn't fit! I had measured the wrong one! who new?! I thought that they were both the same size but of course on closer inspection they are totally different sizes in fact 4 inches different, why didn't I see that? Anyway he will come again today and hopefully windscreen wiping services will be resumed. 

Craft wise I have finished the Hooked and Locked blanket but have yet to finish the back side of the border, the last panel is called apples and leaves...


Working the back side of the border involves working a row of dc around the edge of the blanket and then extending the border and decreasing so that it can be folded over to  encapsulate all those ends. I have never tried this method before I will show you once it's done, however once again this poor blanket will have to take a back seat for while because I have something else on my hook.

My daughter in law asked me if I could make something for her, I was a little none committal because it's her birthday in a couple of weeks so I'm working against the clock hoping to get it done by then as a surprise, so all will be revealed later.


I am so happy to see that all of the Spring bulbs I planted are coming into bloom, I absolutely love daffodils especially the tiny tete a tete. I planted lots of these in pots and in the lawn, I wish they would just lift their heads a little higher so that I can get a better photo.


The sun is shining and Spring is in the air so I hope you all manage to get outside for a little while and enjoy it, have a great weekend. 😘😘


Parties I will be linking to.


Thursday, 11 June 2020

Meet Laurence a Yummy cake and a Strange flower

When I saw the Crochet Llama-no-drama advertised as a stitch along I fell in love.  I'm not usually fond of amigurumi because it's tedious and fiddly but who could resist this cute Llama and as a bonus it has video tutorials, I'm great fan of Mikey from The Crochet Crowd  so I was quite literally hooked on the idea.


I had a home for him too he was to be placed in the Library's Easter raffle along with other lovely makes from the Library knitting and crochet group, the proceeds were to go to the local air ambulance service.


I followed the stitch along but was rather slow compared to others, some of the participants not only completed their Llama's way ahead of the finish line but had made more than one, I could see beautifully completed llama's all over the Facebook page when I hadn't even started on the legs!


Anyway it didn't really matter I had him all finished in plenty of time but then Lock-down happened and the Library's were closed.  So I have Laurence here with me until things get back to normal again.  I have grown quite attached to him and will be quite sad when he eventually leaves home but I won't think of that just yet.

You can find all details about the Llama No-Drama here the video's are still available and take it from me, making him is really worth the effort.

I made this yummy chocolate cake yesterday....


Never Fail Chocolate Cake

1¼ cup SR Flour
1 tsp bicarbonate soda
½ cup cocoa
125 grams softened butter
¾ cup caster sugar
pinch salt
2 eggs
1 cup milk
1 tsp vanilla extract

Cream the butter and sugar,  in a seperate bowl sift all dry ingredients together, beat wet ingredients together in another bowl  then add alternatively to creamed mixture. Beat well then place in a 23 cm cake tin and bake for 180°C for 50 minutes 

When the cake has cooled top with melted chocolate or chocolate icing,  sprinkle pieces of broken chocolate over the top.  The cake is delicious sandwiched with fresh cream for a special occasion.


The picture on the mug says it all really a whole cake for just me!😂 Can you see Jeremy in the background?

Unfortunately the weather has been awful this past week so  I haven't been in my garden much but look! 


I think it looks very strange, this Cordyline flowered for the first time last year 


I didn't think it would flower again so soon but this year it has only one flowering spike last year it had two.  The flowers have a very distinctive smell not that pleasant and quite overpowering you can smell their scent all over the garden but the bees love them.


Have a great weekend 😘😘


See all the great parties I will be linking to in my right side bar.


Friday, 15 March 2019

Blanket Round Up Five

Yes can you believe it, the blanket round ups are still on going because I really love making blankets, and it's just as well because there is always a great need for them, from the tiniest preemie blanket to  bed sized blankets, Loving hands members have even made huge sized blankets for orphan elephants 


This particular blanket is much smaller than that, it's just the right size for a lap blanket, but I have to be honest I love it so much I haven't had the heart to send it on yet.


Sometimes when I'm visiting my favourite blogs I come across something that I just have to make and this was one of those things.  The reason I liked it so much was because I was intrigued by the corner to corner join as you go method which was shown along with a great a tutorial on The Patchwork Heart. Can you imagine hardly any ends to sew in and no joining! 


I then had to search through my scrap yarn and decided that this particular blanket  would be a great contender for the coned yarn that I have stashed up in my loft. As always throughout the making of a stash blanket you are never sure if you'll have enough yarn to complete it, luckily I had enough to make it to a decent size.


Coned yarn is usually 3 or 4 ply so I used three strands together which works out more or less as an Aran weight and wound it into lovely yarn cakes with my yarn winder. I'm sure I took a photo of that lovely yarn all ready to be used but if I did I can't find it anywhere.  It's always a great feeling when you get to the middle of one of those cones because they seem to be never ending. 

You can find..
The corner to corner tutorial here
Who needs your blankets here

Have a great weekend! 😊

You can see all the great parties I'll be linking to in my right side bar.